

Introduction
Securing your web applications and APIs is paramount in today's cloud-centric world. One critical aspect is ensuring that your content origins are accessible only via your CDN (Content Delivery Network), in this case, Amazon CloudFront.
AWS has recently introduced a more efficient method to achieve this, which is using an AWS-managed prefix list for CloudFront. This post will guide you through how to use this new feature to restrict access to your origins effectively.
Why Restrict Origin Access?
Before diving into the technical details, it's essential to understand why restricting origin access is crucial:
Security: Prevent direct access to your origin servers, reducing the attack surface.
Performance: Ensure that all traffic to your origin goes through CloudFront, leveraging its caching and performance optimization.
Cost-Effectiveness: Reduce bandwidth costs by ensuring requests are served from the CDN cache when possible.
Introducing AWS-Managed Prefix List
AWS has introduced a managed prefix list that contains the IP ranges used by CloudFront. This list is maintained and updated by AWS, ensuring you always have the correct ranges without manual intervention.
By using this list, you can configure your origin security groups to allow only CloudFront traffic, enhancing security and reducing administrative overhead.
Step-by-Step Guide to Restricting Origin Traffic
1. Create a CloudFront Distribution
If you haven't already, the first step is to create a CloudFront distribution. This process involves:
Defining your origin (e.g., an EC2 instance, an Elastic Load Balancer).
Configuring cache behaviors.
Setting up SSL/TLS settings for secure communication.
2. Identify Your Origin Security Group
For EC2 instances or Elastic Load Balancers, you need to modify the security group attached to your origin. This security group will be updated to restrict traffic to only CloudFront IP ranges.
3. Modify the Security Group with the AWS-Managed Prefix List
AWS provides a managed prefix list that includes all CloudFront IP ranges. Follow these steps to update your security group:
Access the Security Group:
Navigate to the EC2 Dashboard in the AWS Management Console.
Select "Security Groups" from the left-hand menu.
Find and select the security group associated with your origin.
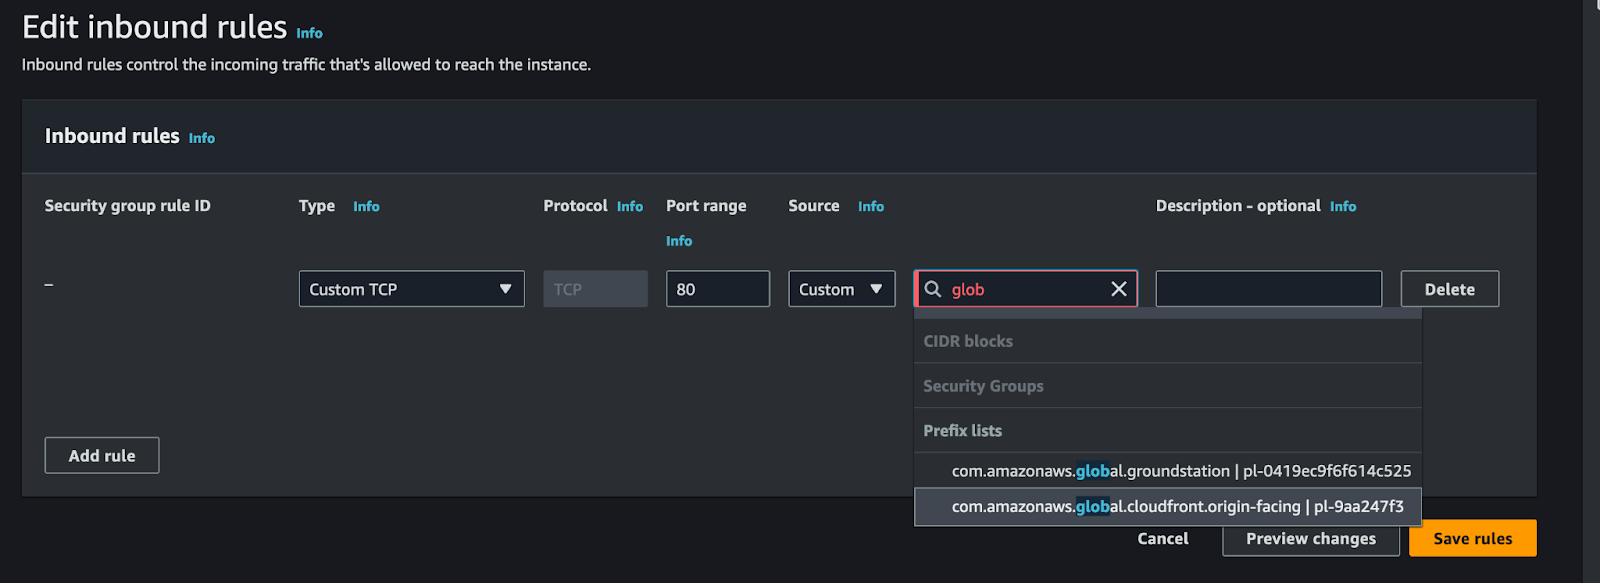
Edit Inbound Rules:
Click on the "Inbound rules" tab.
Click "Edit inbound rules."
Add Rules for the AWS-Managed Prefix List:
Add a new rule:
Type: Custom TCP Rule (or HTTP or HTTPS).
Protocol: TCP.
Port Range: 80 (for HTTP).
Source: Prefix list.
Prefix List: Select the AWS-managed prefix list for CloudFront (com.amazonaws.global.cloudfront.origin-facing).
Add another rule:
Type: Custom TCP Rule (or HTTPS).
Protocol: TCP.
Port Range: 443 (for HTTPS).
Source: Prefix list.
Prefix List: Select the AWS-managed prefix list for CloudFront (com.amazonaws.global.cloudfront.origin-facing).
Save Rules:
Click "Save rules" to apply the changes.
Important Considerations
Rule Limits: The AWS-managed prefix list for CloudFront counts as 55 rules in a security group. The default quota for security groups is 60 rules, leaving room for only 5 additional rules if you add one managed prefix list for CloudFront in your inbound rules. If you limit both HTTP and HTTPS requests using the managed prefix list for CloudFront, you must add two separate rules, which will count as 110 total rules.
Quota Increase: You can request a quota increase for your security group rules if necessary. However, a simpler and more efficient approach is to open only one inbound port, preferably HTTPS. Configure the CloudFront origin protocol policy to use only HTTPS to access your origin. This way, you only need one rule, which counts as 55 rules, staying within the default quota.
4. Configure CloudFront to Use HTTPS (Optional but Recommended)
To ensure that CloudFront communicates with your origin only over HTTPS:
Access CloudFront Distribution:
Navigate to the CloudFront console.
Select your distribution.
Click on "Origins and Origin Groups."
Edit Origin:
Select your origin.
Click "Edit."
Configure Origin Protocol Policy:
Set the "Origin Protocol Policy" to "HTTPS Only."
Save Changes:
Save your changes.
5. Verification
After updating the security group and CloudFront settings, verify that your origin is now only accessible through CloudFront:
Direct Access Test: Try to access your origin directly via its IP address or domain name. This should fail if the security group is configured correctly.
CloudFront Access Test: Access your content through the CloudFront distribution URL. This should succeed, indicating that CloudFront can access the origin.
6. Monitoring and Maintenance
Regularly monitor your CloudFront distribution and origin metrics to ensure everything functions as expected. AWS will automatically update the managed prefix list, so your security group remains up-to-date without additional effort.
Conclusion
Using the AWS-managed prefix list for CloudFront is a modern and efficient way to secure your origin servers. By leveraging this managed service, you can ensure that only traffic from CloudFront reaches your origins, enhancing security and reducing the need for manual IP range updates. Implement this in your infrastructure today to take advantage of these benefits.
Written by, Shubham Kumar, DevSecOps Engineer at Cloud.in
.png)
No comments:
Post a Comment